Tuesday, October 12, 2010

Tomato Sauce

Light Tomato Sauce
7 servings – ½ cup per serving
Adapted from Cooking Light.


.Ingredients:
1 Tbsp olive oil
1 cup finely chopped onion
4 garlic cloves, minced
2 28-oz. cans whole peeled Italian tomatoes, undrained
2/3 cup thinly sliced fresh basil
3/4 tsp salt, divided
1/8 tsp black pepper, divided


In a medium pot or small Dutch oven, heat olive oil over medium heat. Add onion and cook 8 minutes, stirring occasionally, until almost tender. Add garlic and cook an additional 2 minutes, until garlic is fragrant and onion is tender.

Crush the canned tomatoes over the pot by hand, making sure you remove any chunks of stem. Pour in juice leftover in can. Bring everything to a boil.

Drop heat to low and simmer for about 80 or 90 minutes, until sauce is thick and/or the consistency you like.

Kill the heat and stir in the basil, salt, and pepper. I also added in some fresh thyme here since I hand some on hand.  Eat immediately with pasta, or refrigerate overnight to let flavors meld. You can freeze the leftovers, too

Marie was awake and SUPER fussy when I was trying to crush the whole tomatoes by hand. Granted, I did love the rustic textures created by crushing the tomatoes, you could use crushed tomatoes instead to make it easier. 

Wednesday, October 6, 2010

How to Make the Perfect Waffle

I realized after I put up the waffle recipe that some of you may not know how easy it really is to make them yourself. I've had a waffle iron for years, and just recently figured out how to make waffles without destroying them (or myself!).

Before you plug in your waffle iron, use some non-stick spray or wipe it with a paper towel lightly coated with oil. Make sure that it's just a light coating, because too much could alter the taste of your waffle.

Make sure that the waffle iron is HOT. My iron's light goes off whenever it's heated all the way. This is when you want to add the batter.

How much batter to add?
That all depends on your waffle iron. Start with 1/4 c of batter and work your way up until you find the magic number.

Some waffle irons have signals to tell you when your waffle is done. If I would listen to mine, like I have in the past, I would have nothing but burnt or almost burnt waffles.

A waffle is done when there is little to no steam escaping from the sides of your waffle iron, and the waffle is lightly browned.

If you have leftovers, let them cool, throw them in a freezer bag, and save them for another morning when you don't feel like cooking!

Pumpkin Walnut Waffles

Since fall is here officially, and the switch from 100 degrees to 70 is making us all anemic, I thought about making waffles... with pumpkin... and they were amazing! Had my brain been thawed out when I made these this morning, there would be some pictures to accompany it, but it's not the case. If you need pointers to help you make waffles, look here. I promise, I was once there too, perpetually burning waffles. I think that's why I loved pancakes so much!


If you don't have self-rising flour, but you have all-purpose, baking powder and salt, you can sub .
1 cup of all-purpose, 1 1/2 tsp baking powder and 1/4 tsp salt = 1 cup of self rising flour

Same goes for the pumpkin pie spice.
1/2 tsp cinnamon, 1/4 tsp ginger, 1/8 tsp nutmeg and 1/8 tsp cloves = 1 tsp pumpkin pie spice

Ingredients:
2 c self-rising flour
2 tsp pumpkin pie spice
3 large eggs, separated
1 3/4 c milk


1/2 c vegetable oil


1/2 c canned pumpkin (pumpkin pie mix will NOT work here)

1/2 c chopped walnuts (for extra flavor, you can toast these first!)
Your Favorite Syrup


Kitchenware:
 Large Mixing Bowl
2 Small Mixing Bowls
Whisk or Stirring Utensil
Waffle Iron
Fork or other Utensil of choice to get Waffles out

Heat up your waffle iron. In the large bowl, combine flour and pumpkin pie spice.
In a small bowl, beat egg yolks until thick and lemon colored. Then, stir in milk, oil and pumpkin. Add this to flour mixture, and stir until Incorporated.

In another small bowl, beat your egg whites until they are stiff. Carefully, fold them into the flour mixture. Be sure not to overmix this, as overmixing will cause the whites to deflate;therefore losing the extra fluffiness. Fold in nuts at this time.

Bake in waffle iron according to manufacturer's instructions

Serve with warmed syrup and a big glass of milk.

You can double the batch and freeze the leftovers. These are a lot tastier than an Eggo any day!

Barbecue Sauce

This recipe will go along well with the upcoming BBQ Chicken Braid, so be sure to make it! This is undoubtedly some of the best BBQ sauce I've had, and I don't even really like barbecue sauce!


It is really easy to make once you get everything in the pot, and thaws wonderfully from the freezer. You can always double it if you wish, but it is so easy to make, that it really isn't much trouble if you have all of the ingredients. The only tricky ingredient for me to find was the celery seed.

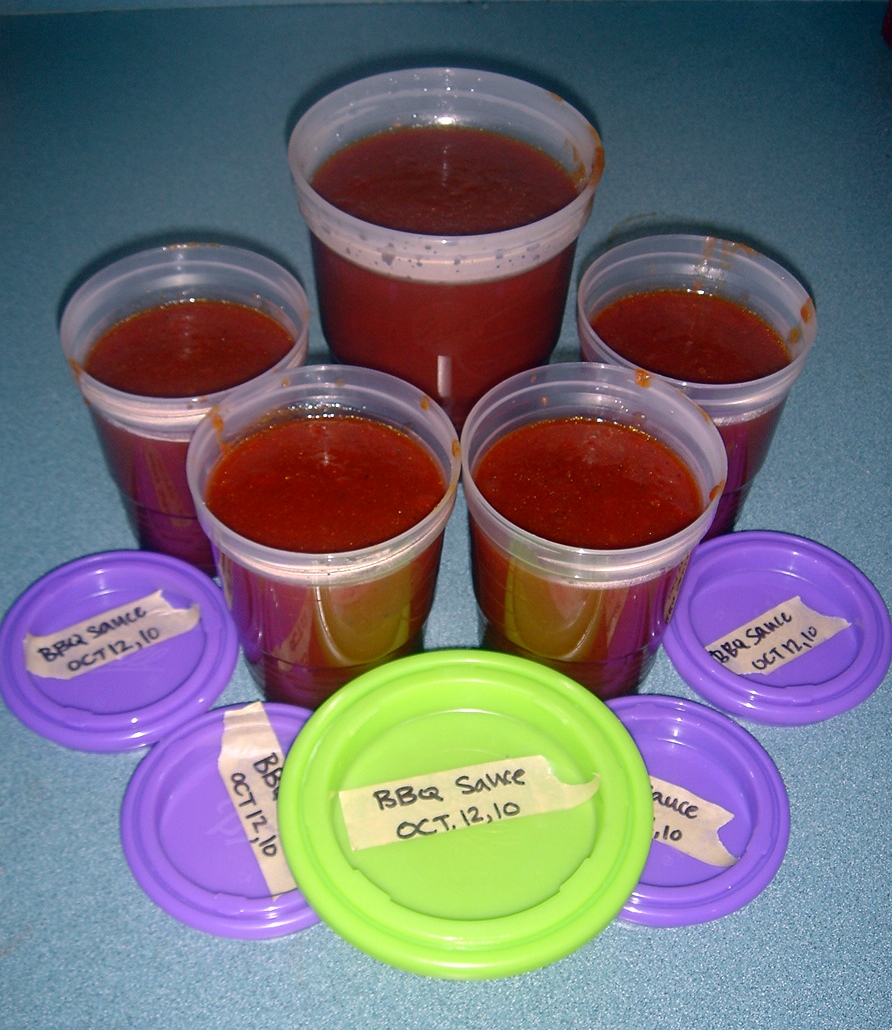
As for a freezing container? If you check out the canning section, Ball has these wonderful plastic jars that are meant for freezing. The larger ones have lime green lids, and smaller, purple. I filled two green jars and a purple jar I also kept two cups of it for a recipe later that evening, so it may take three green and two purple. Either way, they are really handy to have!


This will make about 7 cups of barbecue sauce, and will last for about two months if you use it occasionally.


Ingredients:

2 cups ketchup      (I use Simply Heinz, so there's no added High Fructose Corn Syrup)                
2 cups tomato sauce       (2 of the 8 oz cans)
1 1/4 cups brown sugar               
1 1/4 cups red wine vinegar (or regular white vinegar if you're out)
1/2 cups unsulphured molasses           
2 T butter, cut into small pieces
4 tsp hickory flavored liquid smoke   (found by the barbecue and steak sauces)    
1/2 tsp onion powder
1/2 tsp garlic powder               
1/4 tsp chili powder
1 tsp paprika                   
1/2 tsp celery seed
1/4 tsp ground cinnamon           
1/2 tsp cayenne pepper
1 tsp salt                       
1 tsp coarsely ground pepper
Honey to taste, optional (I added in about a 1/4 cup)


Kitchenware:
Measuring Vessels
Saucepan
Wooden Spoon
Freezing Vessels

In a large saucepan, over medium heat, mix together all the wet ingredients and then add the seasonings. Bring to a boil then reduce the heat to low and simmer for at least 20 minutes, stirring occasionally. The sauce will thicken as it simmers (and then as it cools).  If you have a crock pot handy, I'm sure you could just throw it in there instead. (I'll have to test that out next time!)


Try to plan ahead and simmer for at least an hour.After it cools completely, put in freezing vessels and freeze desired quantity. Make sure you keep some in the refrigerator, because this sauce is great!

 The Finished Product.

I still had a Green Jar of Sauce in the fridge, so I luckily had enough purple ones. These work wonderfully in the fridge as well as the freezer!

Crescent Rolls or Rounds... Your Choice!

This is the ultimate Crescent Roll! Literally, it is more amazing than anything that the dough boy can make, it's a heck of a lot cheaper, and you can pop these in the freezer after you make them. Thaw these bad boys out for 2-5 hours and back at 375 for 10 minutes and you have a chunk of heaven. For as awesome as they are, they are quite simple to make.

WARNING: If you are a carb addict like I am sometimes, this could potentially cause massive weight gain as you have to slather on a teensy bit of butter fresh out of the oven....

This recipe says that it makes 32 rolls, but depending on how big you make them (please try to keep them on the smaller side) they rise quickly and will end up huge if you make them big.... trust me! If you don't feel like rolling them out into crescents, you could always use a cup or biscuit cutter to make them into rounds. (Which is probably what I'll do next time to save freezer space!)

Ingredients:
2 Tablespoons dry yeast, heaping
1/3 cup warm water (110-115 degrees)
9 cups flour, divided (you can use a mixture of white or whole-wheat flour if you’d like)
2 cups warm milk (110-115 degrees)
1 cup butter, melted
1 cup sugar
6 eggs
2 teaspoons salt
3-4 Tablespoons butter, melted (for brushing)

Kitchenware:
Two bowls (one for mixing and one super-huge for the dough to rise in...Really, you'll see when it rises!)
Measuring vessels, cups and spoons
Mixer with dough hooks
Two large sheet pans
Parchment paper
Rolling Pin
Mixing Utensil
Pastry Brush (or spoon if you don't have one)
Pizza cutter (if you want to do crescents)


In a large mixing bowl, dissolve yeast in water. Add 4 cups flour, milk, butter, sugar, eggs and salt. Beat 2 minutes or until smooth.

Add enough remaining flour to form a soft dough. Turn onto floured board and knead lightly. (Or, knead in mixer until sides of bowl are clean, then knead two more minutes.)

Place in a greased bowl, turning dough once to grease top. Cover and let rise in a warm place until doubled (1-3 hours).

Prepare your sheets with parchment paper.

Punch dough down and divide into four equal parts. Roll each part into a 12-inch circle and brush with melted butter. This is where you can decide to do crescents or rounds.

If you choose to do rounds, flour your cutter (or cup) and cut out your rounds. Continue with the other three parts.

If you choose to do crescents, get your pizza cutter ready, and cut the dough into 8 equal parts, like a pizza. If any slices are bigger than the others, just slice it in half. Roll them up, and continue cutting the other parts.

Evenly space the rolls onto the sheets, ensuring that they do not touch while freezing. Place on a flat surface in the freezer for as long as needed. When frozen, take them out and place in a large freezer bag.

On the bag, I write the instructions for thawing and baking so I don't forget. Thaw 2 to 5 hours, bake at 375 for 10 minutes.  The directions do say to thaw the full five hours, but I was in a pinch one night, and after only thawing for two, they still turned out marvelous!

If baking some right after you make them, you can throw then right in the oven at 375 for 10 minutes. Make sure to put butter on them fresh out of the oven.


These are to DIE for and go very well with the Italian Chicken with Mushrooms.

Tuesday, October 5, 2010

Italian Chicken with Mushrooms

Hey again! I figured that while I was wide awake, that I would go ahead and throw up a few more recipes. These won't have pictures to accompany them until I make the recipe, but I will add them soon enough.

This has to be one of my FAVORITE Crock Pot Recipes EVER.

You know how sometimes you have the craving for really great tasting rice and gravy, but just feel blah and don't want to cook... at all?

Well people, here is your EASY BUTTON.

This recipe literally has as little as two ingredients, but I added a few to enhance some flavors.

Seasonings Needed:

Salt
Pepper

Ingredients Needed:

6 Boneless Skinless Chicken Breasts or Thighs
Bottle of Italian Dressing
Mushrooms (as many or as little as you'd like)


To Half:
3 Chicken Breasts
1/2 Bottle Italian dressing (one cup)
Mushrooms (optional)


Kitchenware:

Crockpot
Rice Cooker or other vessel to cook rice in
Spoon

So this recipe really is cake. I usually half the recipe (3 breasts, half the dressing, and mushrooms) for Jason and I, but I could literally lick the Crock Pot clean after this is cooked. Let's say these leftovers don't last for long.


Turn Crock Pot to High.

Season chicken with salt and pepper, then put in Crock Pot.

Add Italian dressing and mushrooms, put on the lid and let cook for 3-5 hours.

And yes folks, That.Is.IT.

Around the 4 hour mark, you can go in with a spoon and chop up the chicken. It will be so tender by this point that it will almost shred.

Make your rice and choice of vegetable to go along with this and you have a complete meal.

Don't say I didn't warn you about how easy this was to make. Now hide the leftovers for yourself!

Chicken Quesadillas

So, after a long day of grocery shopping and an even longer battle with Marie's reflux today, time flew from me. I just finished reorganizing the pantry, got Marie down for a nap finally and then Jason walks in from work.

I had no idea what I was doing for dinner, but he said he was hungry, so make it snappy.

Chicken Quesadillas to the rescue! Super quick to make, and we ALWAYS have cheese, tortillas and chicken stocked.

Seasonings:


(I like to use my own mix of stuff, but you can just use taco or fajita seasoning here.)

Salt
Pepper
Garlic Powder
Cayenne Pepper
Paprika (optional)
Cumin
Chili Powder

Ingredients:

Chicken Breasts or Thighs (leftover chicken does well with this recipe!)
Tortillas (I used Mission's Whole Wheat Tortillas. They have extra crunch!)
Cheese (I used Monterrey Jack)

Various Condiments:
Not limited to, but may include:

Sour Cream
Guacamole
Salsa

Kitchenware Needed:

Cutting Board
Tongs
Knife
Spatula
Griddle or Large Skillet
Meat Mallet (or can substitute other heavy flattening object)


So let's go!

 All of the spices used, with the exception of the chili powder are above. Below are the chicken breasts awaiting annihilation, er, tenderization.


 Now that they are fully tenderized, it's time to season them. Start off with your salt and pepper first on each side. This way, they marry with the chicken and don't get hidden by the other spices you'll be using.

 Heat up your pan or griddle to Medium heat, or 350. When heated, get the chicken cooking!


 I do about 3-5 minutes per side. You want them browned, but not burnt.

Ah, the cheese!! While the chicken is cooking, you can grate your cheese. What the heck, I buy the stuff prepackaged, I can skip this step. No, listen! Ever wonder why the pre-grated cheese is so stiff? It's because the companies use cornstarch to preserve it. Thus, making it harder to melt quickly. Save money by spending a little time (about a minute) to grate some cheese! I promise, it makes a big difference. Easier to melt, and oh so fun to drop crumbs on the floor for the puppies to fight over!


 Get the cleaning fairy to either take care of your dirty pan/griddle or get a new one! While she's working, thinly slice up your chicken, and get your tortillas ready.

You HAVE to get your tortillas crispy. You know how when you make pancakes, you wait for the bubble to appear before you flip it? The same thing goes here. Wait until you see a few bubbles, and then flip. Look at that crispy goodness...

 Carefully, put your cheese and chicken on your tortilla, and not on the pan! Otherwise, you'll make a stinky mess. If there are other things you want to add, such as olives, onions, or the like, throw them on now.

 Throw the other tortilla on top, and you're done! Use a pizza cutter to cut the quesadilla, trust me, it makes it much easier!
Enjoy!


You could use a bunch of different leftover meats in this recipe. Once, I had half of a meatloaf leftover, and I crumbled it up in a pan, added some spices and water, and then made these!

Don't be limited by Cheddar or Monterrey Jack either! Experiment with cheese combinations